Fixes might be blogged to help others — your data stays safe.
SnapToFix | How to Fix a Leaking Toilet Valve Knob – DIY Guide
How to Fix a Leaking Toilet Valve Knob – DIY Guide
Published: 1/8/2026
Fixing a Leaking Toilet Valve: A Step-by-Step Guide
Tighten the valve body or replace the O-ring/washer to fix a leaking toilet valve knob when there’s no packing nut. If tightening doesn’t stop the drip, replace the valve stem/gland or swap the entire shut-off (angle-stop) valve. For temporary sealing use Teflon tape or pipe dope, but always shut off water and drain the line before starting repairs.
The Hard Truth: A leaking toilet valve can waste hundreds of gallons of water and quietly drive your water bill up.
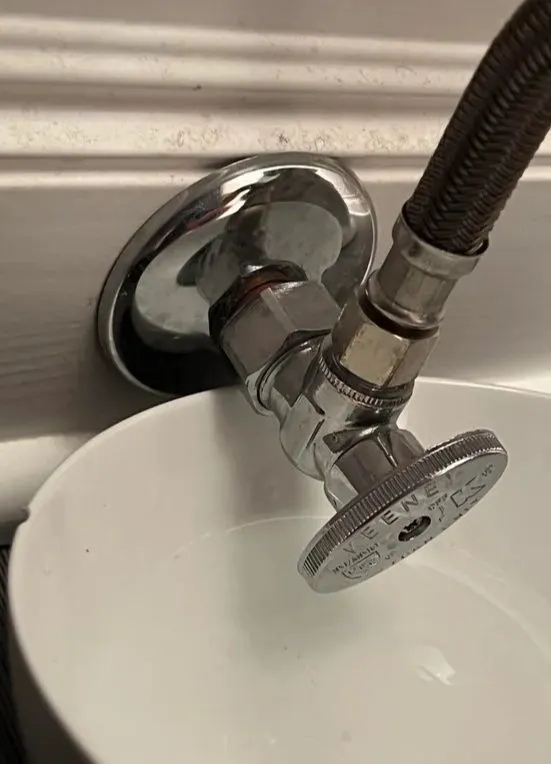
A small drip at the toilet shut-off valve (the little knob/angle stop behind the toilet) is usually an easy DIY fix — but sometimes the leak comes from the stem or internal parts with no obvious packing nut to tighten. This guide shows you how to diagnose the leak, try safe quick fixes, replace O-rings or stems when possible, and when it’s faster and safer to replace the whole valve. I’ll include tools, parts, costs, and safety tips so you can pick the right path.
1. Diagnose where the leak is coming from
Before you touch anything, dry the area and observe where the water appears:
* Around the knob/handle (stem area): likely a worn O-ring, washer, bonnet or gland leak.
* At the valve body or supply nut (where pipe meets valve): loose compression nut, ferrule, or a cracked fitting.
* Between the valve and wall/pipe: failing connection or corroded pipe.
* From the supply line or flex hose: the hose itself may be cracked or the nut loose.
Turn the valve fully off (clockwise). If the drip stops completely, the leak is likely upstream (in the tank or supply). If it continues, it’s local to the valve or connections. Use a dry paper towel to localize tiny drips. Knowing the exact source saves time and prevents unnecessary replacement.
2. Safe quick fixes (try these first)
A. Tighten the packing/bonnet (if present)
Some valves have a small nut behind the handle (packing or bonnet nut). If you have one, try a small quarter-turn with an adjustable wrench — don’t overtighten (risk cracking). After tightening, cycle the valve open/closed and watch for leaks. If the nut is absent, skip to B.
B. Tighten the compression nut at the supply line
If water appears at the nut where the supply tube meets the valve, use a wrench to slightly tighten the compression nut (one-eighth to one-quarter turn). If the ferrule or tubing is damaged, you’ll need to replace them.
C. Replace an O-ring or small internal washer
Some modern angle stops allow access to the stem/packing. Turn off the water, remove the handle, and unscrew the stem/bonnet. Inspect the O-ring/washer; replace with a matching part. Reassemble and test. This fixes many stem leaks when the valve design is serviceable.
D. Temporary seal: pipe dope or Teflon tape
If threads are leaking and you can disassemble, apply fresh Teflon tape (wrap clockwise) or pipe dope on male threads before reassembling. This is a temporary repair if the mating surfaces aren’t damaged. Don’t use tape on compression fittings — replace the ferrule instead.
Quick safety note: Always shut off water and drain the small line before disassembling anything. If the valve is old, corroded, or the packing area is fused, don’t force it — you can snap the valve or pipe.
3. Replacing the valve stem / cartridge (if serviceable)
If the valve design has a removable stem or cartridge, you can often replace just that part:
1. Turn off the water (valve closed) and shut off the supply to the toilet. Open the tank to relieve pressure and drain line water.
2. Remove the handle (usually a small screw) and take off any decorative cap.
3. Unscrew bonnet/retaining nut with pliers or wrench and carefully pull out the stem/cartridge.
4. Take the old parts to the hardware store and match O-rings, seats, or the cartridge. Buy a replacement kit if available.
5. Lubricate O-rings lightly with plumber’s grease, reassemble, and test.
If the stem is corroded or the design is not serviceable (no removable cartridge), stop and consider full valve replacement. Improper reassembly can cause bigger leaks. Guides like Balkan Plumbing and repair forums detail this process and warn about seized valves.
4. Replace the whole shut-off (angle stop) valve — when it’s the right move
Replacing the entire valve is often the fastest, most reliable solution when:
* The valve is old/corroded or the stem is seized.
* The valve is soldered or nipples are damaged.
* You want long-term peace of mind (modern angle stops are inexpensive and reliable).
Typical replacement steps (compression type):
1. Turn off the house main if you can’t isolate the local supply. Drain the tank.
2. Loosen and remove the supply nut and tubing.
3. Unscrew the compression nut (or cut out the old valve if soldered).
4. Install the new valve (compression valves slide on with a ferrule; thread and tighten to spec). iFixit and many DIY guides show this as a straightforward job for a homeowner with basic tools. Test carefully for leaks.
Cost & time: A new angle stop valve costs roughly $10–$30 retail; a plumber call + parts typically runs $80–$200 depending on location. DIY replacement often takes 30–60 minutes for a compression valve; soldered valves take longer and require skills.
Tools & parts checklist
* Adjustable wrench and small open-end wrenches
* Screwdrivers (flat & Phillips)
* Replacement O-rings, seat washers, or stem kit (match model)
* New compression angle stop valve (¼" or 3/8" supply as needed)
* Teflon tape and/or pipe dope (for threaded connections)
* Plumber’s grease, rags, bucket
Tip: Take the old part to the store for an exact match — many valves have common but different thread/fittings.
Troubleshooting & common pitfalls
* Valve still leaks after tightening: you may have a damaged seat, worn compression ferrule, or cracked body — time to replace.
* Valve is seized: forcing it can shear the stem or break the pipe — cut and replace.
* Compression nut keeps leaking after replacement: ensure ferrule is seated and nut is tightened properly; don’t overtighten.
* Soldered valve removal needed: if you’re not comfortable with soldering/plumbing torches, call a pro — safety first.
When to call a professional
Call a plumber if:
* You can’t isolate the water and must work on a live, pressurized system.
* The valve is soldered to copper and you’re not comfortable cutting/sweating.
* You detect corrosion in the adjacent piping or signs of water damage in the wall.
* Repeated DIY fixes fail — a professional will replace the valve correctly and test for hidden issues.
A small valve leak can waste significant water (EPA estimates a running toilet can waste ~200 gallons/day), so don’t delay if you’re uncertain.
Frequently Asked Questions
Can I use Teflon tape on a leaking toilet valve?
Teflon (PTFE) tape is useful on threaded pipe joints to improve the thread seal, but it’s not a cure for worn internal seats or damaged compression fittings. Use tape only on threaded connections, not on compression ferrules.
How do I know if I need to replace the valve stem?
If the stem is corroded, the valve leaks at the stem after tightening, or the valve does not shut off fully, replacing the stem/cartridge (if serviceable) or the whole valve is recommended. Inspect the removed stem for grooves, wear, or pitting.
What if the valve is soldered to the pipe?
Soldered (sweat) valves require cutting and sweating a new valve on or using a qualified plumber. Don’t attempt soldering if you lack experience — it’s a fire risk and can damage nearby structures.
How much water does a leaking toilet cost?
A running or leaking toilet can waste approximately 200 gallons of water per day (EPA and local water utility estimates), so fixing leaks promptly saves water and money.
Is replacing the entire valve always necessary?
Not always. If the valve is serviceable and the stem/packing can be replaced, you can fix it without changing the whole valve. But when the valve is old, corroded, non-serviceable, or leaking at the body, full replacement is often the most reliable and cost-effective solution.