Broken Bed Corner Repair
To fix a broken bed corner, first assess the damage severity. For minor cracks, apply wood glue liberally, clamp tightly for 24 hours, then reinforce with metal L-brackets or corner braces. For severe breaks, use wood glue plus 2-3 wood screws driven at angles through the joint, or insert wooden dowels for hidden reinforcement. Always let glue cure fully before removing clamps and using the bed.
Assessing Your Broken Bed Corner
Types of Bed Corner Damage
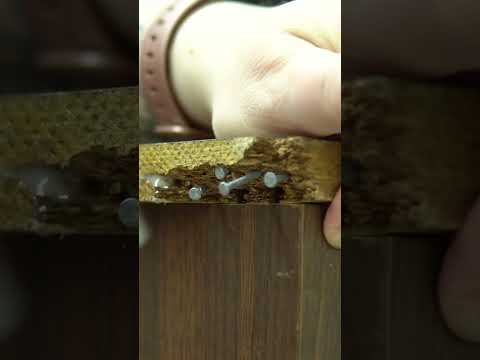
Hairline cracks (Surface level): Small splits in the wood surface that haven't penetrated deeply. The corner still feels solid when you apply pressure. Minor cracks (¼ to ½ inch deep): Visible splits that penetrate partway through the wood but haven't separated the pieces. Some flex or movement when you test the corner. Major cracks (Over ½ inch deep): Deep splits that go most of the way through the wood. Significant movement and instability when testing the corner. Complete breaks: The corner has separated entirely into two or more pieces. Total structural failure requiring the most extensive repair. The image shows a close-up of a broken bed corner with a visible crack in the wood and a makeshift fix using metal wire. The glossy finish on the wood indicates a recent break.Testing for Stability
Visual inspection: Look closely at the crack. Can you see how deep it goes? Is it only surface-level or does it penetrate the full thickness? Flex test: Gently apply pressure to both sides of the crack. Does the wood move independently? How much give is there? Weight test: Carefully push down on the corner. Does it feel solid or does it flex dangerously? Never apply your full body weight to a suspected break.When to Repair vs. Replace
Repair is appropriate for: * Single cracks or breaks in otherwise solid wood * Damage limited to one corner or joint * Frames with sentimental or monetary value * Situations where replacement costs significantly more than repair Consider replacement when: * Multiple corners are damaged or weakened * The wood is rotted, not just cracked * Previous repairs have failed * The entire frame shows signs of structural wear * Repair costs approach replacement costsHow to Fix a Broken Bed Corner
Gather Your Materials
Essential materials for all repairs: * High-quality wood glue (Titebond or Gorilla Wood Glue) * Bar clamps or C-clamps (at least 2) * Damp cloth for wiping excess glue * Sandpaper (120-150 grit) For reinforced repairs, you may also need: * Metal L-brackets or corner braces * Wood screws (1¼ to 1½ inches) * Drill with bits * Screwdriver or impact driver * Wooden dowels (for hidden reinforcement)Method 1: Simple Glue Repair (For Minor Cracks)
This method works for cracks that haven't separated completely and where the wood still fits together tightly. Process: 1. Disassemble if possible: Remove the mattress and box spring. If your bed design allows, separate the affected corner from the rest of the frame for easier access and better clamping. 2. Clean the crack: Use a putty knife or old toothbrush to remove any dust, debris, or old glue from the crack. The wood surfaces must be clean for proper adhesion. 3. Apply wood glue liberally: Don't be shy—squeeze glue generously into the crack. For wider cracks, gently pry them open slightly to get glue deep inside, then let them close. 4. Clamp tightly: Position clamps to pull the cracked sections together tightly. Use at least two clamps positioned at different angles for even pressure. Tighten until you see a small amount of glue squeeze out. 5. Wipe excess glue: Immediately wipe away squeezed-out glue with a damp cloth. Dried glue is difficult to sand off later. 6. Let cure for 24 hours: This is critical. Glue instructions may say "30 minutes to 1 hour," but for maximum strength, leave clamps on for the full 24 hours undisturbed. 7. Remove clamps and test: After 24 hours, carefully remove clamps and test the repair by applying gentle pressure. The joint should feel solid. Pro tip: A properly glued wood joint is actually stronger than the wood itself. The glue bonds at a molecular level, creating an incredibly strong connection when done correctly.Method 2: Glue Plus Screw Reinforcement (For Major Cracks)
When cracks are deep or the corner experiences significant stress, combining glue with mechanical fasteners creates the strongest repair. Process: 1. Follow steps 1-5 from Method 1 to clean and glue the crack. 2. Drill pilot holes: While the glue is still wet and pieces are clamped, drill 2-3 pilot holes through the joint at angles. Pilot holes prevent wood from splitting when you insert screws. 3. Insert wood screws: Drive 1¼ to 1½ inch wood screws through the pilot holes, pulling the pieces tightly together. The screws act as clamps while also adding permanent reinforcement. 4. Wipe excess glue: Clean any glue squeezed out by the screw pressure. 5. Let cure: Allow 24-48 hours of cure time before using the bed. 6. Optional finishing: Fill screw holes with wood putty, sand smooth, and touch up with matching stain or paint for a professional appearance. Important note: Drive screws at angles (not straight through) to maximize holding power and avoid having screw points protrude from the other side.Method 3: Metal Bracket Reinforcement (Strongest Option)
For corners that bear significant weight or have broken before, metal corner braces provide maximum long-term strength. Process: 1. Repair the break: First, use Method 1 or 2 to glue (and optionally screw) the broken pieces back together. Let cure completely. 2. Position corner brackets: Place metal L-brackets or corner braces on the inside of the bed corner where they won't be visible but will provide structural support. 3. Mark screw holes: Use a pencil to mark where bracket screw holes will go. 4. Drill pilot holes: Drill pilot holes slightly smaller than your screw diameter at each marked location. 5. Attach brackets: Secure brackets with wood screws, ensuring they're tight but not overtightened (which can strip the wood). 6. Test stability: Apply pressure to the corner to verify solid, stable repair. Advantages of metal brackets: * Provides permanent reinforcement that prevents future breaks * Distributes stress across a larger area * Can be removed if needed for future repairs * Works even if the glued joint fails [Secure the Broken Piece]: The combination of wood glue for adhesion and metal brackets for structural support creates repairs that often outlast the original construction.Method 4: Wooden Dowel Reinforcement (Hidden Strength)
For those who want invisible reinforcement without exposed brackets or screws, wooden dowels provide hidden structural support. Process: 1. Glue the break: Follow Method 1 to glue and clamp the crack. Let cure fully. 2. Drill dowel holes: Drill 2-3 holes (typically ⅜ inch diameter) perpendicular to the crack, going through both sides of the break. Holes should be 1½ to 2 inches deep. 3. Cut dowels: Cut wooden dowels to length—they should extend through the crack and into solid wood on both sides. 4. Apply glue: Put wood glue on the dowels and inside the drilled holes. 5. Insert dowels: Tap dowels into the holes with a hammer until fully seated. Wipe away excess glue. 6. Let cure: Allow 24 hours for complete curing. 7. Trim and finish: If dowel ends protrude, trim them flush with a saw and sand smooth. Apply matching stain or finish. This method creates incredibly strong repairs that are completely hidden from view.Preventing Future Bed Corner Breaks
Regular Inspection and Maintenance
Check quarterly: Every 3 months, inspect all bed corner joints for small cracks, loosening, or stress signs. Catching problems early makes repairs easier. Tighten fasteners: If your bed uses bolts or screws at corners, check and tighten them regularly. Vibration and movement gradually loosen fasteners over time. Address squeaks immediately: Squeaking indicates movement at joints—an early warning sign of developing problems.Proper Use and Handling
Don't move the bed by corners: When relocating your bed, lift from the frame sides or use the headboard/footboard—never grab and pull on corner posts. Disassemble for major moves: For significant moves, disassemble the bed frame rather than dragging or forcing it through doorways. Distribute weight evenly: Use a center support beam if your bed frame doesn't have one. This prevents excessive stress on corner joints. Limit jumping and rough use: Vigorous activities stress corner joints beyond their design limits. Be mindful of how you use your bed.Environmental Factors
Control humidity: Extreme humidity changes cause wood to expand and contract, creating stress at joints. Use a dehumidifier in damp environments. Avoid direct heat sources: Don't position beds against heating vents or radiators. Heat dries wood and weakens glued joints. Level your floor: An unlevel floor puts uneven stress on bed corners. Use shims under bed legs to level the frame.The Practitioner's Reality Check
Frequently Asked Questions
What materials do I need to fix a broken bed corner?
You'll need wood glue, at least 2 clamps, a damp cloth, and sandpaper. For reinforced repairs, add metal L-brackets or corner braces, wood screws (1¼ to 1½ inches), a drill with bits, and a screwdriver. Total cost is typically under $15-20.
How long should I let the glue dry?
Always let wood glue cure for a minimum of 24 hours before removing clamps or using the bed. For high-stress corners, 48 hours is better. The "30-minute handling time" on bottles is insufficient for repairs that will bear weight.
Can I use nails instead of screws?
Screws provide significantly stronger holding power than nails because they thread into the wood rather than just displacing it. Nails can work in a pinch, but screws create more reliable, longer-lasting repairs.
What if the break is severe or the wood is completely separated?
For severe breaks, use Method 2 or 3: glue the pieces together, then reinforce with either wood screws driven at angles through the joint or metal corner brackets. For complete separations, you may need to drill and insert wooden dowels for additional internal reinforcement.
How can I prevent future breaks?
Inspect corner joints quarterly, tighten any fasteners regularly, avoid moving the bed by grabbing corners, use a center support beam, and distribute weight evenly. Address squeaks immediately as they indicate developing joint problems.
Is it safe to sleep on a bed with a broken corner?
No, never use a bed with a broken corner until it's properly repaired and fully cured. A compromised corner can lead to sudden collapse, potentially causing injury and certainly damaging your mattress.
Should I use regular wood glue or something stronger?
Standard wood glue (like Titebond or Gorilla Wood Glue) creates bonds stronger than the wood itself when applied correctly. You don't need specialty glues—proper technique matters more than glue type. Avoid super glue or epoxy for wood furniture repairs.
Can I hide the metal brackets used for reinforcement?
Yes, position brackets on the inside corners of the bed frame where they won't be visible during normal use. Alternatively, use Method 4 (wooden dowel reinforcement) for completely hidden structural support.
What if I've already repaired it once and it broke again?
If a glue-only repair has failed, the corner likely experiences too much stress for adhesive alone. Repeat the repair using reinforcement: either screws through the joint or metal corner brackets to provide mechanical strength alongside the glue bond.
Do I need to refinish the wood after repair?
For cosmetic repairs, yes. Sand the repaired area smooth (120-150 grit sandpaper), then apply matching stain or paint. If brackets or screws show, fill screw holes with wood putty before refinishing. For hidden repairs using dowels, refinishing may not be necessary.