Fixes might be blogged to help others — your data stays safe.
SnapToFix | Ceiling Water Damage: Causes, Risks & DIY Repairs
Ceiling Water Damage: Causes, Risks & DIY Repairs
Published: 1/18/2026
Water Damage on Ceiling Moulding: Causes, Risks, and How to Fix It
Water damage on ceiling moulding is usually caused by roof leaks, plumbing leaks, condensation, or poor ventilation. If left untreated, it can lead to mould growth, wood rot, and structural damage. The correct fix involves identifying and stopping the water source, removing damaged moulding, treating mould, and restoring the ceiling trim.
The hidden danger: ceiling moulding damage is rarely just cosmetic.
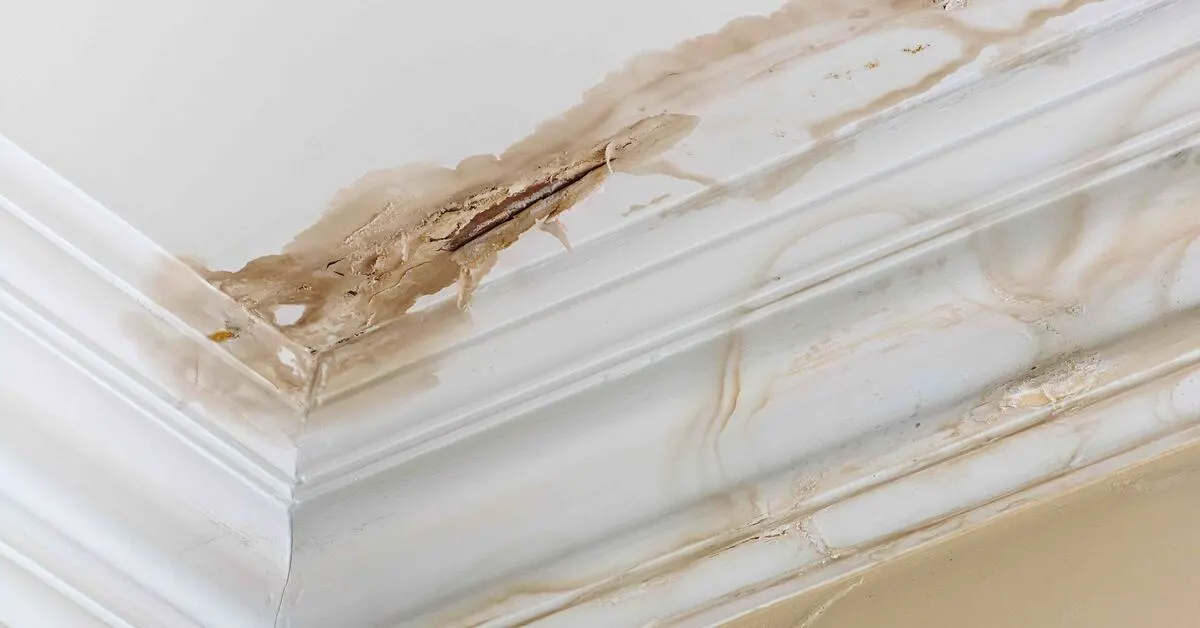
Water damage on ceiling moulding is one of those home issues that’s easy to ignore—until it gets worse. A small brown stain or peeling paint along the ceiling trim may not look serious, but it often signals ongoing moisture intrusion behind the scenes.
Left untreated, water damage can spread into drywall, framing, and insulation, leading to mould growth and structural deterioration. This guide explains what causes water damage on ceiling moulding, how to assess the severity, and the correct steps to repair and prevent it from returning.
What Causes Water Damage on Ceiling Moulding?
Water damage on ceiling moulding typically comes from one of four sources:
1. Roof leaks – Damaged shingles, flashing, or roof penetrations allow water to travel along framing and settle at ceiling edges.
2. Plumbing leaks – Leaking pipes, bathrooms, or HVAC condensate lines above the ceiling often cause localized staining.
3. Condensation – Poor insulation or ventilation (especially in bathrooms and kitchens) can cause moisture buildup along cooler ceiling mouldings.
4. Poor ventilation – Trapped humidity allows moisture to linger, encouraging mould growth over time.
Because water follows gravity and framing paths, the visible damage may be far from the actual leak source.
Warning Signs You Shouldn’t Ignore
Common indicators of water damage on ceiling moulding include:
* Brown or yellow water stains
* Peeling, bubbling, or cracking paint
* Swollen or warped moulding
* Soft or crumbly wood
* Black, green, or white mould spots
* Musty odors near the ceiling
Health and Structural Risks
Water-damaged ceiling moulding isn’t just an appearance issue. Prolonged moisture can lead to:
* Mould growth, which may trigger allergies, asthma, or respiratory issues
* Wood rot, weakening ceiling trim and nearby framing
* Drywall deterioration, leading to sagging or collapse
* Higher repair costs if damage spreads unnoticed
Homes with persistent moisture problems often require more extensive remediation later, especially if mould spreads into insulation or wall cavities.
Step-by-Step: How to Fix Water Damage on Ceiling Moulding
### Step 1: Identify and Stop the Water Source
Before any repair, locate the source of moisture. Check the roof, plumbing above the area, attic insulation, and ventilation systems. Repairs should never begin until the leak or condensation issue is resolved.
### Step 2: Assess the Extent of Damage
Light surface staining may only require cleaning and repainting. However, swollen, soft, or mouldy moulding usually needs removal and replacement.
### Step 3: Remove Damaged Moulding
Carefully pry off affected moulding. If mould is present, wear gloves and a mask. Dispose of damaged material properly.
### Step 4: Treat Mould and Dry the Area
Clean the exposed area using a mould-killing solution or professional treatment. Ensure the ceiling cavity is completely dry before reinstalling trim.
### Step 5: Replace and Repaint
Install new moulding, prime with a stain-blocking primer, and repaint. This prevents old stains from bleeding through.
Critical Rule: Cosmetic repairs always come last—never first.
DIY Repair vs Professional Help
If you’re uncertain about the source of moisture, professional inspection can save money long-term.
Situation
DIY Suitable
Call a Professional
Minor staining, no mould
✅
❌
Active leak
❌
✅
Visible mould growth
❌
✅
Structural softening
❌
✅
Unsure of leak source
❌
✅
How to Prevent Future Water Damage
* Inspect ceilings and moulding quarterly
* Fix roof and plumbing leaks immediately
* Use exhaust fans in bathrooms and kitchens
* Improve attic insulation and ventilation
* Control indoor humidity levels
* Address small stains before they spread
Prevention is significantly cheaper than remediation.
The Practitioner’s Reality Check
The Counter-Intuitive Insight:
Most ceiling moulding damage starts small and slow. Homeowners often notice it months after the real problem begins.
The Common Trap:
Painting over stains without fixing moisture. This almost guarantees the problem will return—often worse than before.
Frequently Asked Questions
Is water damage on ceiling moulding dangerous?
Yes. It can indicate hidden leaks or mould growth, which may lead to health risks and structural damage if ignored.
Can I just paint over water stains?
No. Painting without fixing the moisture source will only hide the problem temporarily.
How long does it take to repair ceiling moulding damage?
Minor repairs may take a day. Repairs involving leaks or mould can take several days depending on drying time.
How do I know if mould is present?
Look for discoloration, fuzzy patches, or musty odors. Professional testing may be required if unsure.
Should I replace or repair moulding?
If the moulding is swollen, soft, or mouldy, replacement is recommended.
Conclusion
Water damage on ceiling moulding is a warning sign that shouldn’t be ignored. Whether caused by leaks, condensation, or ventilation issues, the key is to act early. By identifying the root cause and making proper repairs, you can protect your home’s structure, appearance, and indoor air quality.
Bottom line: Fix the moisture first—everything else comes after.
Repair Insights
Keywords: ceiling water damage, ceiling moulding repair, mould growth removal, water stains ceiling, home repair tips, water damage causes, prevent ceiling mould