Quick Fix for a Broken Nail at Home
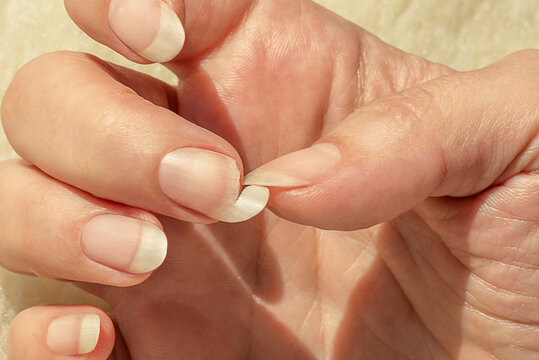
The image shows a broken nail, with the nail plate separated from the rest of the nail. The user describes the issue as: "I just broke my nail". The likely cause of damage is accidental impact or snagging on an object. Assuming the break is minor and not too deep, addressing this issue promptly is important to prevent further damage and maintain nail health. This guide will walk you through a simple, DIY repair using common household items, perfect for beginners.
Overview:
This guide provides a step-by-step approach to fixing a broken nail at home using household items.
- Time to Complete: 10–20 minutes
- Skill Level: Beginner, no prior repair experience needed
- Prerequisites: A clean workspace, basic household items (e.g., nail glue, a tea bag, and nail polish)
- Expected Outcome: A temporarily repaired nail to prevent further breakage
- Safety Precautions: Be cautious when handling small items and avoid ingesting any materials
- Cost-Saving Benefits: This repair uses items you likely already own or can easily find at low cost, avoiding expensive salon visits.
Tools and Materials Required:
- Nail glue (available at pharmacies or online for $1–$3)
- A tea bag
- Scissors
- Nail file
- Clear nail polish (optional, $1–$2)
- Nail buffer (optional, $2–$5)
Step-by-Step Repair Guide:
- Prepare the Area: Clean the broken nail and surrounding area with a dry cloth.
- Apply Nail Glue: Carefully apply a small amount of nail glue to the broken part of the nail.
- Reinforce with Tea Bag: Cut a small piece of a tea bag and place it over the glued area.
- Secure the Patch: Apply another layer of nail glue over the tea bag piece.
- Shape and Smooth: Use a nail file to shape and smooth out the area.
- Finish with Polish: Apply clear nail polish to seal and add extra strength.
Estimated Cost:
- Materials:
- Nail glue: $1–$3
- Tea bag: $0 (reuse from your kitchen)
- Scissors: $0 (household item)
- Nail file: $0–$2 (assuming you have one)
- Clear nail polish: $1–$2
- Total Estimated Cost: $3–$7
Tips and Warnings:
- Test any household items on a small area first to avoid allergic reactions.
- Avoid using excessive glue to prevent a messy fix.
- For frequent breaks, consider strengthening your nails with a nail buffer or nail strengthening base coat.
Additional Engagement Elements:
FAQ:
Q: Can I use this method on an acrylic nail?
A: This method works best for natural nails; acrylic nails may require special adhesive.
Q: What if I don’t have nail glue?
A: You can use a strong household adhesive like super glue carefully, but be cautious.
Q: How long will this repair last?
A: This fix is temporary; consider a professional repair for a longer-lasting solution.
This guide empowers you to fix your broken nail quickly and affordably, ensuring you can maintain your nail health without breaking the bank.


