Fixing a Broken Nail at Home
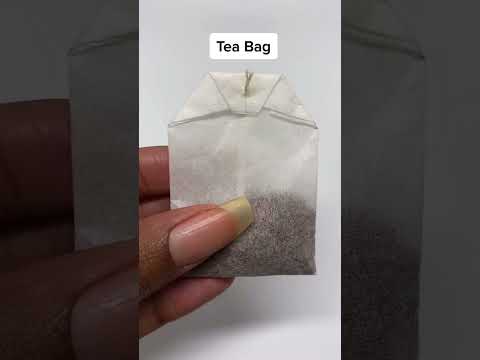
To fix a broken nail at home using the tea bag method: cut a small piece of tea bag to cover the break, apply nail glue to the nail, place the tea bag piece over the glue using tweezers, saturate with another layer of glue, let dry completely (5-10 minutes), buff smooth, and seal with base coat or clear polish. This repair lasts 1-2 weeks while your nail grows out. For gel users, apply builder gel instead of regular glue for extra strength.
Understanding Your Broken Nail
Types of Nail Breaks
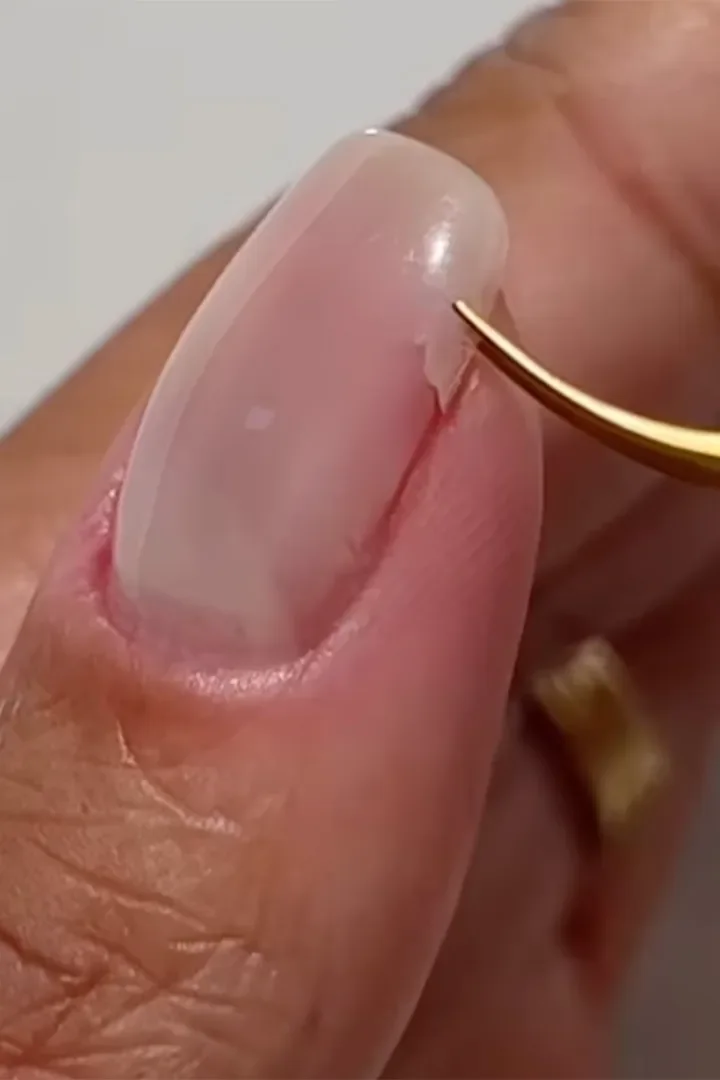
Surface crack or split: Small crack that hasn't separated completely. The nail still holds together but you can see the split line. Deep split: Crack goes deep into the nail bed, possibly painful. The two sides of the split move independently. Broken edge: Corner or edge of nail has broken off cleanly. The break doesn't extend into the nail bed. Vertical break down to quick: The worst type—split runs from tip down to where nail meets skin. Often painful and may bleed. The image shows a close-up of a broken nail with a gold tool applying glue. The nail is cracked and fragile, requiring immediate repair to prevent further damage.When to DIY vs. See a Professional
DIY repair works for: * Surface-level cracks and splits * Broken edges or corners * Splits that don't involve pain or bleeding * Natural nails (not acrylic or gel extensions) See a professional for: * Deep breaks with pain, bleeding, or exposed nail bed * Infections or signs of nail disease * Damage to the nail matrix (growth area under cuticle) * Acrylic or gel extension breaks requiring professional removalHow to Fix a Broken Nail with Tea Bag Method
What You'll Need
Essential materials: * Tea bag (any type—the mesh fabric is what matters) * Nail glue or super glue * Small scissors * Tweezers * Nail file and buffer * Clear top coat or base coat Optional but helpful: * Nail cleanser or rubbing alcohol * Cotton pads * Cuticle pusher * UV gel polish and lamp (for stronger repairs)Step-by-Step Tea Bag Method
Step 1: Remove Polish and Clean Remove any existing nail polish with acetone-free remover. Wash hands thoroughly with soap and water, or wipe nails with rubbing alcohol. The nail surface must be completely clean and oil-free for glue to bond properly. Step 2: Prepare the Nail Gently buff the split area so it's flush with your nail—no sharp edges should be sticking out. This creates a smooth surface for the tea bag to adhere to. Don't over-buff; you're just smoothing, not removing layers. Step 3: Cut Tea Bag Piece Cut open your tea bag and empty the tea leaves. Cut a small piece of the mesh fabric big enough to cover the break plus a little extra around the edges (usually about the size of the broken area plus 2-3mm on all sides). Pro tip: Cut the tea bag slightly larger if your break is further up so you can wrap the material onto the underside of the nail for a stronger mend. Step 4: Apply First Layer of Glue Apply a thin layer of nail glue (or super glue) directly to the nail, covering the entire break area. Put a bit extra on the split itself to fill the crack. Step 5: Place Tea Bag While the glue is still wet, use tweezers to carefully place the cut piece of tea bag over the break. Press down gently to ensure it adheres well and follows the natural curve of your nail. Smooth out any wrinkles or air bubbles. Step 6: Saturate with More Glue Apply another generous layer of glue over the top of the tea bag, saturating the fabric completely. Use a tool (like an orange stick or applicator) to set it in place, making sure the split is completely covered. Some people like to wrap the tea bag around the split for extra security. Step 7: Let Dry Completely This step is crucial. Let the glue dry completely—it should be hard to the touch. This typically takes 5-10 minutes. Do not rush this step. Step 8: Buff Smooth Once completely dry, gently buff over the glued area to smooth out roughness and blend the edges with your natural nail. Be careful not to buff through the tea bag layer or over the split itself. The goal is a smooth surface that feels flush with the rest of your nail. Step 9: Seal and Protect Dust off any buffing debris and apply base coat, nail hardener, or clear top coat. For extra durability, some nail techs recommend using gel no-wipe top coat cured under a UV lamp. Step 10: Polish as Desired Once sealed, you can apply regular nail polish or gel polish over the repair. The tea bag mesh will be virtually invisible under polish. The key to a successful repair is to be gentle and patient. Rushing through drying time or buffing too aggressively will compromise your repair.How Long Does This Repair Last?
The tea bag fix will last about 2 weeks, giving the broken part strength and allowing your nail time to grow out. You'll need to refresh the repair with each manicure until the damaged section grows long enough to trim off.Alternative Nail Repair Methods
Method 2: Gel Polish Repair (Strongest Option)
If you have gel polish and a UV lamp at home, this creates an even stronger repair than the tea bag method. Process: 1. Follow Steps 1-2 from tea bag method (clean and buff) 2. Apply base coat and cure under UV lamp 3. Apply a layer of builder gel (thicker than regular gel polish) over the break 4. Cure under lamp 5. Apply 2-3 more thin layers of builder gel, curing between each 6. Finish with gel top coat and cure 7. Wipe with cleanser to remove tacky layer Builder gel adds significant strength while remaining flexible. This repair can last the full 2-3 weeks of a gel manicure.Method 3: Silk Wrap (Professional Alternative)
Silk wrap kits (available at beauty supply stores) work exactly like the tea bag method but use pre-cut silk fabric designed specifically for nail repair. Advantages over tea bag: * Thinner material creates smoother finish * Pre-cut sizes available * Designed specifically for nails Process is identical to tea bag method, just substitute silk wrap material for the tea bag piece.Method 4: Clear Polish Only (Temporary Fix)
For very minor surface cracks or when you don't have glue available: 1. Clean and buff the crack 2. Apply 2-3 thick layers of clear nail polish over the crack 3. Let each layer dry completely before adding the next 4. Finish with a strengthening top coat This provides minimal reinforcement and only lasts a few days, but works in a pinch.What NOT to Use
Regular household glue: Doesn't bond properly to nails and can cause irritation. Craft glue or Elmer's glue: Not strong enough and won't hold. Hot glue: Dangerous and completely ineffective. Tape or bandages: Don't bond to nails and trap moisture, promoting infection.Preventing Nail Breaks
Moisturize Regularly
Dry nails are brittle nails. Apply cuticle oil or hand cream at least twice daily, especially after washing hands. Nail beds need hydration just like skin.Avoid Harsh Chemicals
Wear gloves when cleaning with harsh chemicals, doing dishes, or gardening. Water and chemicals weaken nails and make them prone to breaking.File in One Direction
Never saw back and forth when filing—this creates micro-tears that lead to splits. File in one direction only using smooth, long strokes.Keep Nails at Moderate Length
Extremely long nails are more prone to breaks. Find a length that works for your lifestyle and activities.Use Strengthening Treatments
Weekly treatments with nail strengthener or hardener can help prevent breaks. Look for formulas with keratin or calcium.Maintain Proper Nutrition
Biotin supplements, protein, and foods rich in vitamins A, C, and E support healthy nail growth from the inside out.Give Nails Polish-Free Breaks
If you wear polish constantly, give nails a week off every month to breathe and recover.The Practitioner's Reality Check
Frequently Asked Questions
What are the best materials to use for fixing a broken nail?
Nail glue or super glue (they contain the same active ingredient), a tea bag or silk wrap for reinforcement, tweezers, nail file, buffer, and clear top coat. Gel polish and UV lamp provide even stronger repairs if you have them.
How long does it take to fix a broken nail at home?
The tea bag method takes 10-15 minutes for the actual repair, plus 5-10 minutes drying time. Total time from start to finished polish is about 20-30 minutes.
Can I use regular glue to fix my nail?
No, don't use household craft glue or Elmer's glue—these don't bond properly to nails. Super glue works perfectly as it contains the same ingredient (cyanoacrylate) as nail glue.
How do I prevent my nails from breaking in the future?
Keep nails moisturized with cuticle oil, avoid using nails as tools, wear gloves when cleaning or doing dishes, file in one direction only, maintain moderate length, and use nail strengthening treatments weekly.
Can I fix a broken nail on any type of nail?
The tea bag method works best on natural nails. For acrylic or gel extensions, you'll likely need professional repair. Very severe breaks with bleeding or pain should be seen by a professional.
What if my nail is severely damaged?
If your nail shows signs of infection, involves the nail bed or matrix, has significant bleeding, or causes severe pain, see a healthcare provider or professional nail technician rather than attempting DIY repair.
Does the tea bag really work?
Yes! The mesh fabric of tea bags provides surprisingly strong reinforcement. It acts like a silk wrap (which professionals use), creating a flexible but sturdy bridge across the break that lasts 1-2 weeks.
Can I paint over the tea bag repair?
Absolutely. Once you've applied the tea bag with glue, buffed smooth, and sealed with top coat, you can apply regular or gel polish over it. The tea bag mesh becomes virtually invisible under polish.
How often do I need to redo the repair?
Refresh the repair with each manicure (typically every 1-2 weeks) until your nail grows out enough to trim off the damaged section completely. Depending on nail growth rate, this takes 4-8 weeks.
What's the difference between nail glue and super glue?
They contain the same active ingredient (cyanoacrylate), so they work equally well. Nail glue is simply marketed for beauty use and may come in smaller bottles with brush applicators, while super glue is cheaper and equally effective for nail repairs.